Showing posts with label Papercraft. Show all posts

Monday, December 12, 2022

Terrain Workshop: Papercraft Trees 4

I've been wanting to use a stack of 2x2 Round Bricks for a papercraft tree trunk for a while now. But, like an idiot, I kept trying to make things needlessly complex by trying to attach the paper to all the Studs on the 2x2 Rounds. Then one night as I'm trying to get to sleep the solution pops into my head.


So the solution is reducing the core from a stack of 2x2 Round Bricks to a stack of 1x1 Round Bricks. The 1x1 Bricks are attached to the 2x2 Bricks with an Axle/Pin. There's another one at the other end capped off with a Cone. This gives a better attachment point for the paper than trying to fasten it to studs. Harkening back to my second papercraft tree post there's a Minifig Ring in the middle.  I actually used most of the top end of that tree design for this build.


So there are three 2x2 Round bricks, one 2x2 Round Plate, two Axle/Pins, eight 1x1 Round Bricks, one Minifig Ring, two pieces of Paper, and a Cone for a total of 18 pieces.  That makes 3 Hits and it is 41 feet tall in 6P scale.


Flickr page.  Once again I hope I've given people ideas or techniques to use in their terrain builds.

Wednesday, June 15, 2022

Build Journal: Papercraft Zizy Vehicles

This combines two of my favorite obsessions, Papercraft and Zizy Vehicles.  I was thinking about the Paper Silos I posted about on Monday while driving to work one morning when I passed a tanker truck.  My mind immediately shifted to designing a papercraft tank to fit on the trailer of a truck.  I felt that since building "realistic" tanker trucks was sort of difficult in Lego that this might be an easier technique.

Since my initial silo build used 4x4 Round Brick w/Pinholes to form the core I retained that but mounted them sideways on Large Jumpers, keeping the 1x1 Round Plates to secure the paper on the other side.  The paper pieces are 2.25" x 2.5" and are standard copier paper.  There's no central shaft holding the Round Bricks together so securing the initial two points of contact may be a little difficult.  In 6P Scale the tank is roughly 10' diameter by 20' long.  The deck is 20' long by 15' wide in 6P scale.  2 Hits will destroy the tank and the deck it sits on.  It will take 4 more hits to destroy the rest of the trailer.

Tanker Trailer


Parts


And the best part about this?
No Brackets.

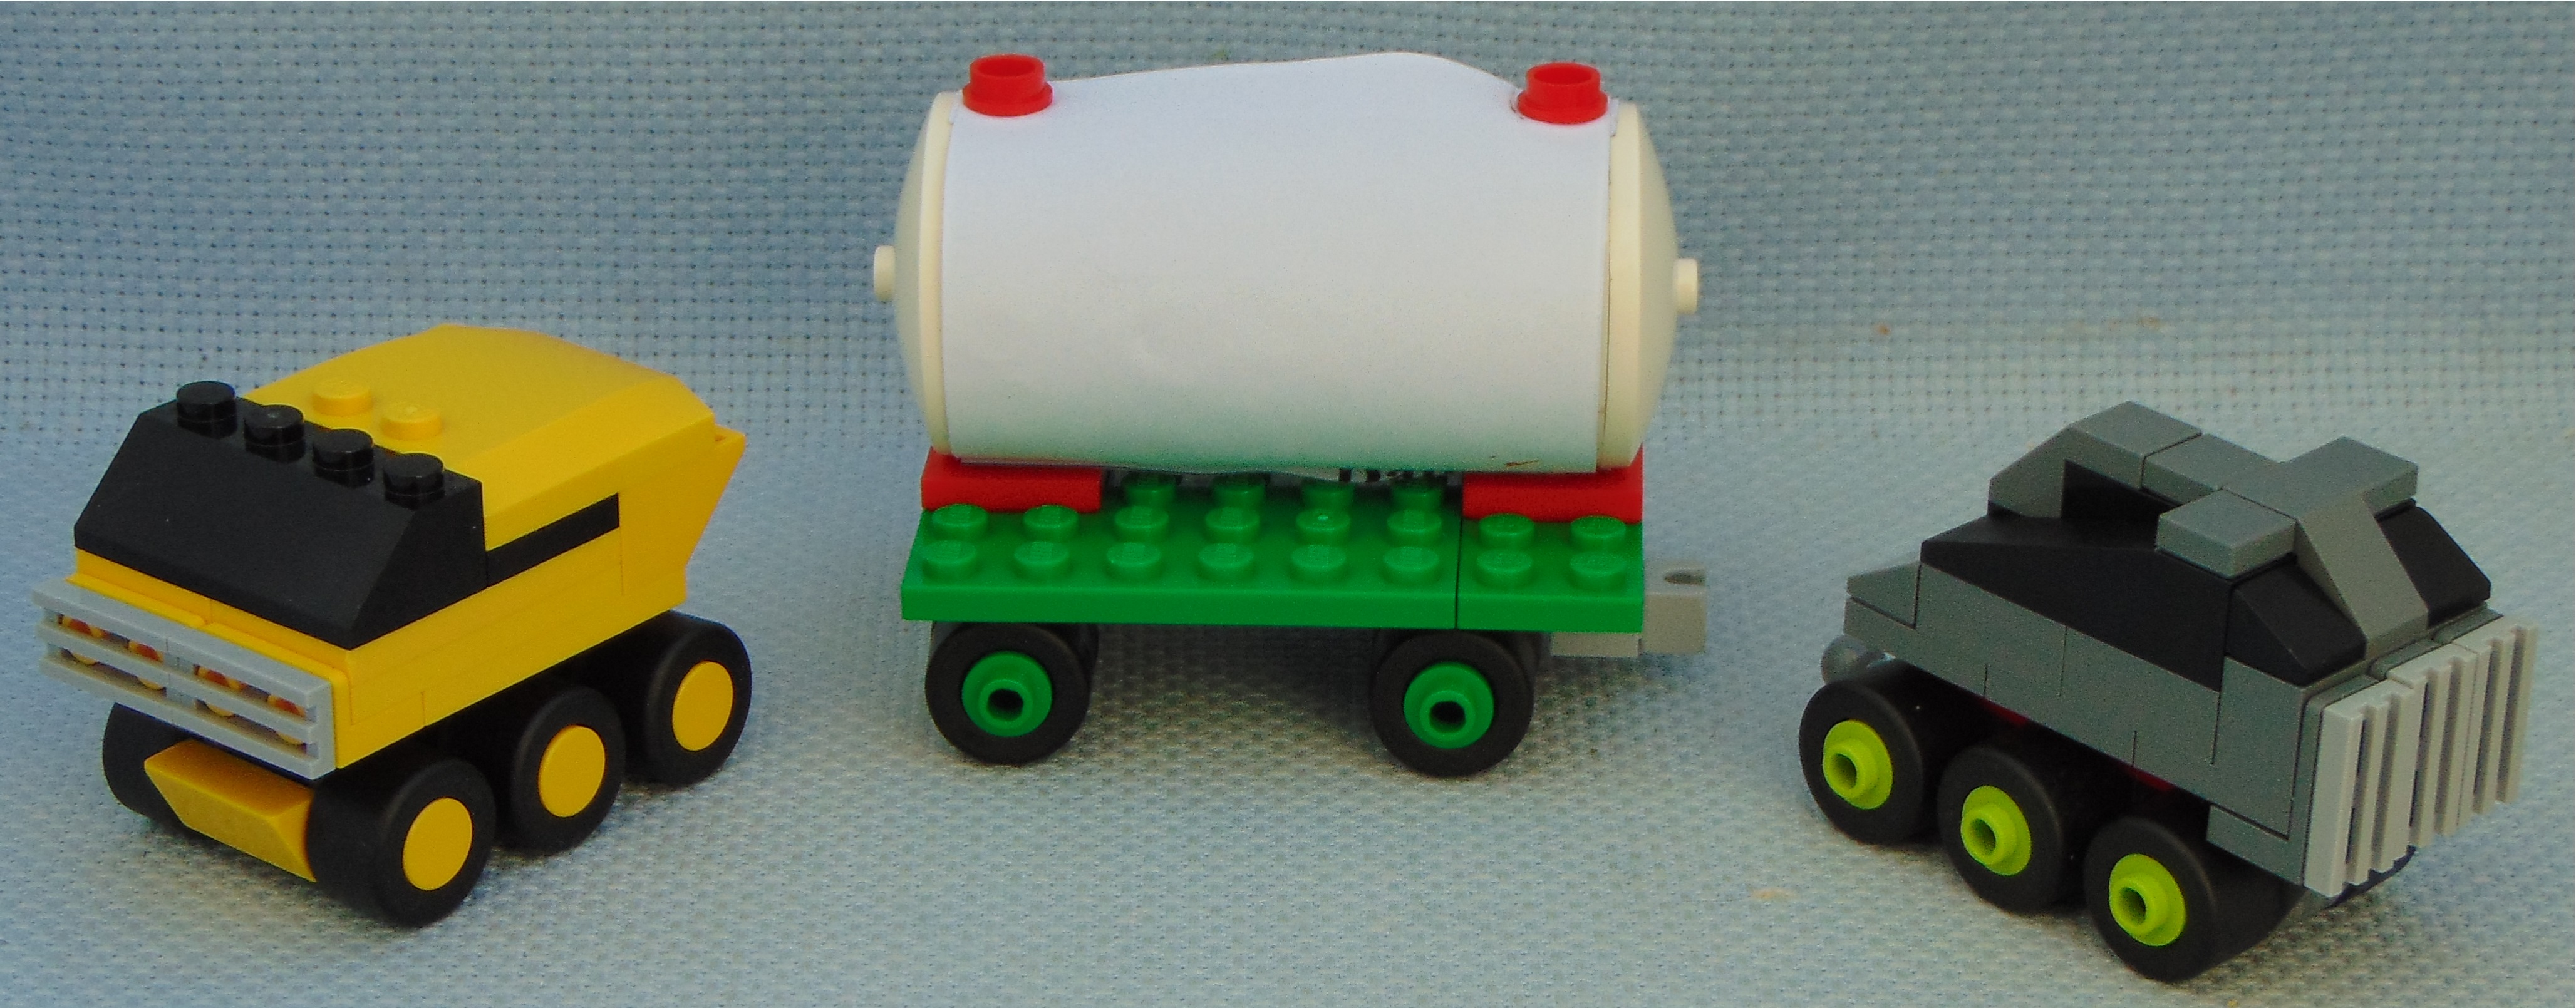
I actually made two different Tractors to haul the Trailer.  I made them different to highlight the nature of independent truckers and the differences between 3-wide and 4-wide design.  Also, because I already have a Tractor done up in Octan colors. 


The first one I built was made to look big and powerful.  It will take 2 or 3 Hits to no longer be Cover -- depending on where you are in relation to the attack.  It will take 8 Hits to completely destroy.


The second one is meant to look more "sporty" -- hence the color and the more streamlined design.  It will take 2 or 3 Hits to no longer be Cover -- depending on where you are in relation to the attack.  It will take 7 Hits to completely destroy.


Group Picture


Once again, I hope people like this continuing
exploration of using paper in terrain builds.

Monday, June 13, 2022

Terrain Workshop: Papercraft Silo

So I'm back on my Papercraft trip again.  I had an idea last week on how to make a silo using paper sections to make the sides.

The initial thought was using a 4x4 Round Brick w/Pinholes forming the base attachment points.  I then dug into my stash of Supports and came up with a 2x2x8 Support w/Grooves & Top Peg to provide the height.  It's topped out by a 4x4 Inverted Dish and a 1x1 Round Tile.  The paper sections are 3.75" L x 2.5" W and are standard copier paper.  In 6P Scale these are roughly 10' wide by 34' tall.  There are 12 pieces so it will take 2 Hits before being destroyed.

Small Silo


Parts


I then moved up to the 6x6 Round Plate for the next size using a 2x2x10 Triangular Girder for spacing.  Without the pin holes from the 4x4 Round Brick I had to add in some 1x2 Technic Bricks w/Hole for attachment points for the paper, still using 1x1 Round Plates to secure them.  It's topped out by a 6x6 Inverted Dish (Solid Studs).  The paper sections are 3" L x 3.75" W.  In 6P Scale these are roughly 15' wide by 34' tall.  There are 14 pieces so it will take 3 Hits before being destroyed -- you should be able to sneak in four more pieces take make it an even 18.  I'll admit these were the most difficult to assemble.

Medium Silo


Parts


Moving up again in size, the largest silo uses the 4x8 Half Circle Plate to define the diameter and the 2x2x13 Support w/5 Pinholes to provide the spacing.  I keep the 1x2 Technic Bricks w/Hole for attachment points for the paper, again using 1x1 Round Plates to secure them.  I added in four 4x4 Macaroni Bricks and four 1x2 Bricks to pad out the parts count a little.  It's topped out by a 8x8 Inverted Dish (Solid Studs).  The paper sections are 4" L x 4.5" W.  In 6P Scale these are roughly 20' wide by 46' tall.  There are 24 pieces so it will take 4 Hits before being destroyed.

Large Silo


Parts


One of the fun things about these builds is that, due to the pieces with Pinholes, you could possibly replace the 1x1 Round Plates with Friction Pins and run 7mm Ribbed Hose between the silos like they held some sort of liquid or as if they were giant stills.  Unfortunately the assembly of the larger silos was so annoying I didn't try.  I think the for the six stud across designs would be best to replace the 1x2 Technic Bricks with 2x6x1.3 Technic Brick w/Axle Holes.  That then brings into question the center support.  I guess that will be grist for a future blog post.

Once again, I hope people like this continuing exploration of using paper in terrain builds.

Wednesday, October 20, 2021

Terrain Workshop: Papercraft Quonset Hut 2

My prior attempt at a papercraft Quonset Hut worked pretty well.  Although I came up with a way to reduce the amount of parts after I put up the blog post.  After the last game I was talking with the other players about terrain and something one of them said brought to mind my old "Sci-Fi Outpost" table-settingI've used Quonset Huts as some of the terrain for that setting.  So I figured I'd try and update those old builds with the new hotness.  :-)

So I was wrong in saying that these would always be six Studs wide and three Bricks tall, 15 feet by 9 feet in 6P scale, since I figured out a way to add one Brick level in height.  With this build we have the Curved Slope 3x1x2 w/Stud as before.  But we add in a Brick 1x3 on top of one Brick 1x2 and one Brick w/1Stud on Side, to form half of the end of the hut.  Double it up to finish the end then double those up to get the other end.  Cover it in two pieces of paper, holes punched at the corners.  Instead of using Round Tiles to hold the paper in place, we're using 1x8 Tiles at the bottom and 2x2 Tiles at the top.  This cuts four pieces out of the total.  The door is still a Window Frame 1x2x2.6 topped with a Square Tile.  That totals up to 24 pieces which is 4 Hits.  So I managed to make a larger version with the same parts total.  In 6P scale this version is 13 feet Tall by 15 feet Wide by 22.5 feet Long -- counting the doorway.

I've discovered while working on the most recent papercraft builds that Log Bricks make excellent templates for marking the spots where the holes have to go.

If you want to update the smaller version, swap out the 1x2 Bricks for a 1x4 Brick.  Along with the changes to the Tiles securing the paper, that brings the parts total down to 18 pieces which is 3 Hits.


Standard Size Comparisons.


I hope people like this continuing exploration of using paper in terrain builds.

Friday, September 10, 2021

Terrain Workshop: Papercraft Trees 3

I wasn't planning on doing another one of these so soon but I came up with a build yesterday that I wanted to share.  We're still using the folding technique that Lego uses with its Minifig Capes.  But this time we've modified the trunk of the tree that's hidden under the paper.


This is the sixth papercraft tree.  I had cut the paper sections for a
different build that didn't work out.  I'm glad I kept them and used
them for this.  It will take two hits before being completely destroyed.  


Here's a size comparison picture.  In 6P scale it's roughly 34 feet tall.


Here's a breakdown of the parts involved.  The 1x1 Round Brick is the only piece from previous builds.  The trunk of the tree is four 1x3 Hinge Cylinders, one 1x2 Hinge Cylinder w/1 Finger & Axle Hole, one 1x2 Hinge Cylinder w/2 Fingers & Axle Hole, one 2L Notched Axle, and one Axle/Pin.  This gives us
a total of 12 pieces including the paper.  The base was made for a different build and is composed of one 1x2 Technic Brick w/Axle Hole, two 1x6 Bricks, two 1x2 Slopes, two 1x2 Inverted Slopes, and four 1x2 Bricks.

This is the template used to make the "leaf" sections.


Let's talk Pros & Cons.  Pros: It's fairly tall and wide so it should look
good on a table.  It's a reasonable amount of some fairly common parts.
Cons:  The technique used to build it can get a little fiddly when trying to
attach the paper and mount it in the base (see picture).  The internal
colors aren't great.  You could substitute Black for all the pieces of
the trunk but the Axle/Pin in Black hasn't been made since 2006.


So, once again, I hope people like this and find it useful.

Wednesday, September 8, 2021

Terrain Workshop: Papercraft Trees 2

In a continuing effort to make better -- and more interesting -- terrain, I've experimented with more paper creations.  This time I'm using a folding technique that Lego uses with its Minifig Capes.  This technique creates a bend in the paper/cloth which creates more volume and that's what we're looking for when using pieces of paper.


This is the fifth papercraft tree.  It's not originally what I was working towards
but after a quick tweak it turned into something worth keeping.  It will
take four hits before being completely destroyed.  Brickshelf gallery.


Here's a size comparison picture.  In 6P scale it's 52 feet tall.


Here's a breakdown of the parts involved.  If you swap out the three 1x1
Round Plates for a 1x1 Round Brick the total number of pieces comes 
down to 18.  I'm not sure why I didn't do this in the first place.  I dipped
back into the parts I used with the original Lego Tree Build Journal by
using an Inkwell to connect the lower trunk section to  the upper.


This is the template used to make the "leaf" sections.


Let's talk Pros & Cons.  Pros: It's tall and should look good on a table.  It's a
reasonable amount of some fairly common parts.  Cons: The technique
used to build it is a little fiddly (see picture).  The Minifig Ring piece is
only in 31 sets.  You'll only get 1.5 to 2 trees out of one piece of paper.

So, once again, I hope people like this and find it useful.

Monday, August 16, 2021

Terrain Workshop: Papercraft Quonset Hut

I've made a couple of attempts at building Quonset Huts in Lego.  They've always felt too "sturdy" for something that's basically a half tube of corrugated aluminum with walls at either end.


Version 1, not curved enough.  Brickshelf galley.


Version 2, better but still not right.  Brickshelf gallery.


The first one will take eight Hits before being completely destroyed, the second one six, and this is something with an 8 Stud by 6 Stud footprint.  Compare them to this building which covers the area of six of those Quonset Huts and only takes 10 Hits to destroy.

For some reason this part stuck in my head the other day as I was driving home from work.  Put it on top of one Brick 1x2 and one Brick w/1Stud on Side, then double it up to get one end of the Hut.  Double it again to get the other end.  Cover it in two pieces of paper, holes punched at the corners, held in place by Round Tiles.  Use a Window Frame 1x2x2.6 as a door section and top it with a Square Tile.  That totals up to 24 pieces which is 4 Hits.  It's always going to be six Studs wide and three Bricks tall, 15 feet by 9 feet in 6P scale, but you can control the length of the building by changing the length of the paper sections.

Brickshelf gallery

I guess I should have used pencil to mark out the sections of paper.  I also had to cut a third paper section because when I punched the holes the first time I was way off and it didn't fit.  The second and third pieces I measured against the framework and marked the spots for the holes.  I ended up putting the parts on a base because the doorway would have been freestanding without it.  In 6P Scale this ends up being 17.5 feet long by 15 feet wide by 9 feet tall -- not counting the doorway.


I also made a different doorway section because
I couldn't find the arched window piece at first.


Standard Size Comparisons.


I hope people like this continuing exploration of using paper in terrain builds.

Monday, July 19, 2021

Terrain Workshop: Papercraft Trees

Thanks to a video posted by Shades Corvid on the Discord, I started experimenting with using paper pieces as part of terrain.  I printed off a copy of Playfool's Stud Stencil as a precursor but I ended up free-handing all of the hole punches.  I started with a simple rectangle piece then moved on to some that were a little more complex.


Here's the first tree with the rectangular "branch" sections.  A simple start and it looks
 decent enough.  It will take two Hits before being destroyed. Brickshelf gallery.


My second paper shape was an octagon.  Unfortunately it ended up being
too much paper to fold them all up so I went with just two pieces.  This
left it looking like a tube and not all that great.  I might try adding in two
of the rectangular sections to see if it can work.  Brickshelf gallery.


The third attempt was a hexagonal diamond shape.  This one looked
a lot better and had greater coverage then the rectangular paper strips.
It will take two Hits before being destroyed.  Brickshelf gallery.


The fourth one was made a little later.  I went back to the rectangular
shape but this time I cut two-thirds of the length into smaller strips. 
These are meant to resemble the branches of a Willow tree or something
similar.  It will take one Hit before being destroyed.  Brickshelf gallery.


Here's a size comparison.


And a breakdown shot so you can build your own.  All of
the work to make these four examples -- sketching, cutting,
and assembling -- took maybe half an hour.  So making
enough to act as terrain for a game shouldn't take too long.


These are the templates I used  to make the leaf sections.


The main reason behind doing this -- besides the fact that it's neat -- goes back to the post I did on creating good looking Lego trees.  The techniques I used in this post will add volume to tree designs without adding density.  I hope that makes sense to people.  You can also change things up a little.  The 1x1x6 Pillar that I use for the tree trunk comes in many colors.  If you combine a paper color other than green and a trunk color other than brown you could have the start of a sci-fi plant life selection.  Using paper might also be a method to reduce cost.  Overall it's about trying to help people to make cooler looking tables so they can have a great  time playing.