Wednesday, June 15, 2022

Build Journal: Papercraft Zizy Vehicles

This combines two of my favorite obsessions, Papercraft and Zizy Vehicles.  I was thinking about the Paper Silos I posted about on Monday while driving to work one morning when I passed a tanker truck.  My mind immediately shifted to designing a papercraft tank to fit on the trailer of a truck.  I felt that since building "realistic" tanker trucks was sort of difficult in Lego that this might be an easier technique.

Since my initial silo build used 4x4 Round Brick w/Pinholes to form the core I retained that but mounted them sideways on Large Jumpers, keeping the 1x1 Round Plates to secure the paper on the other side.  The paper pieces are 2.25" x 2.5" and are standard copier paper.  There's no central shaft holding the Round Bricks together so securing the initial two points of contact may be a little difficult.  In 6P Scale the tank is roughly 10' diameter by 20' long.  The deck is 20' long by 15' wide in 6P scale.  2 Hits will destroy the tank and the deck it sits on.  It will take 4 more hits to destroy the rest of the trailer.

Tanker Trailer


Parts


And the best part about this?
No Brackets.

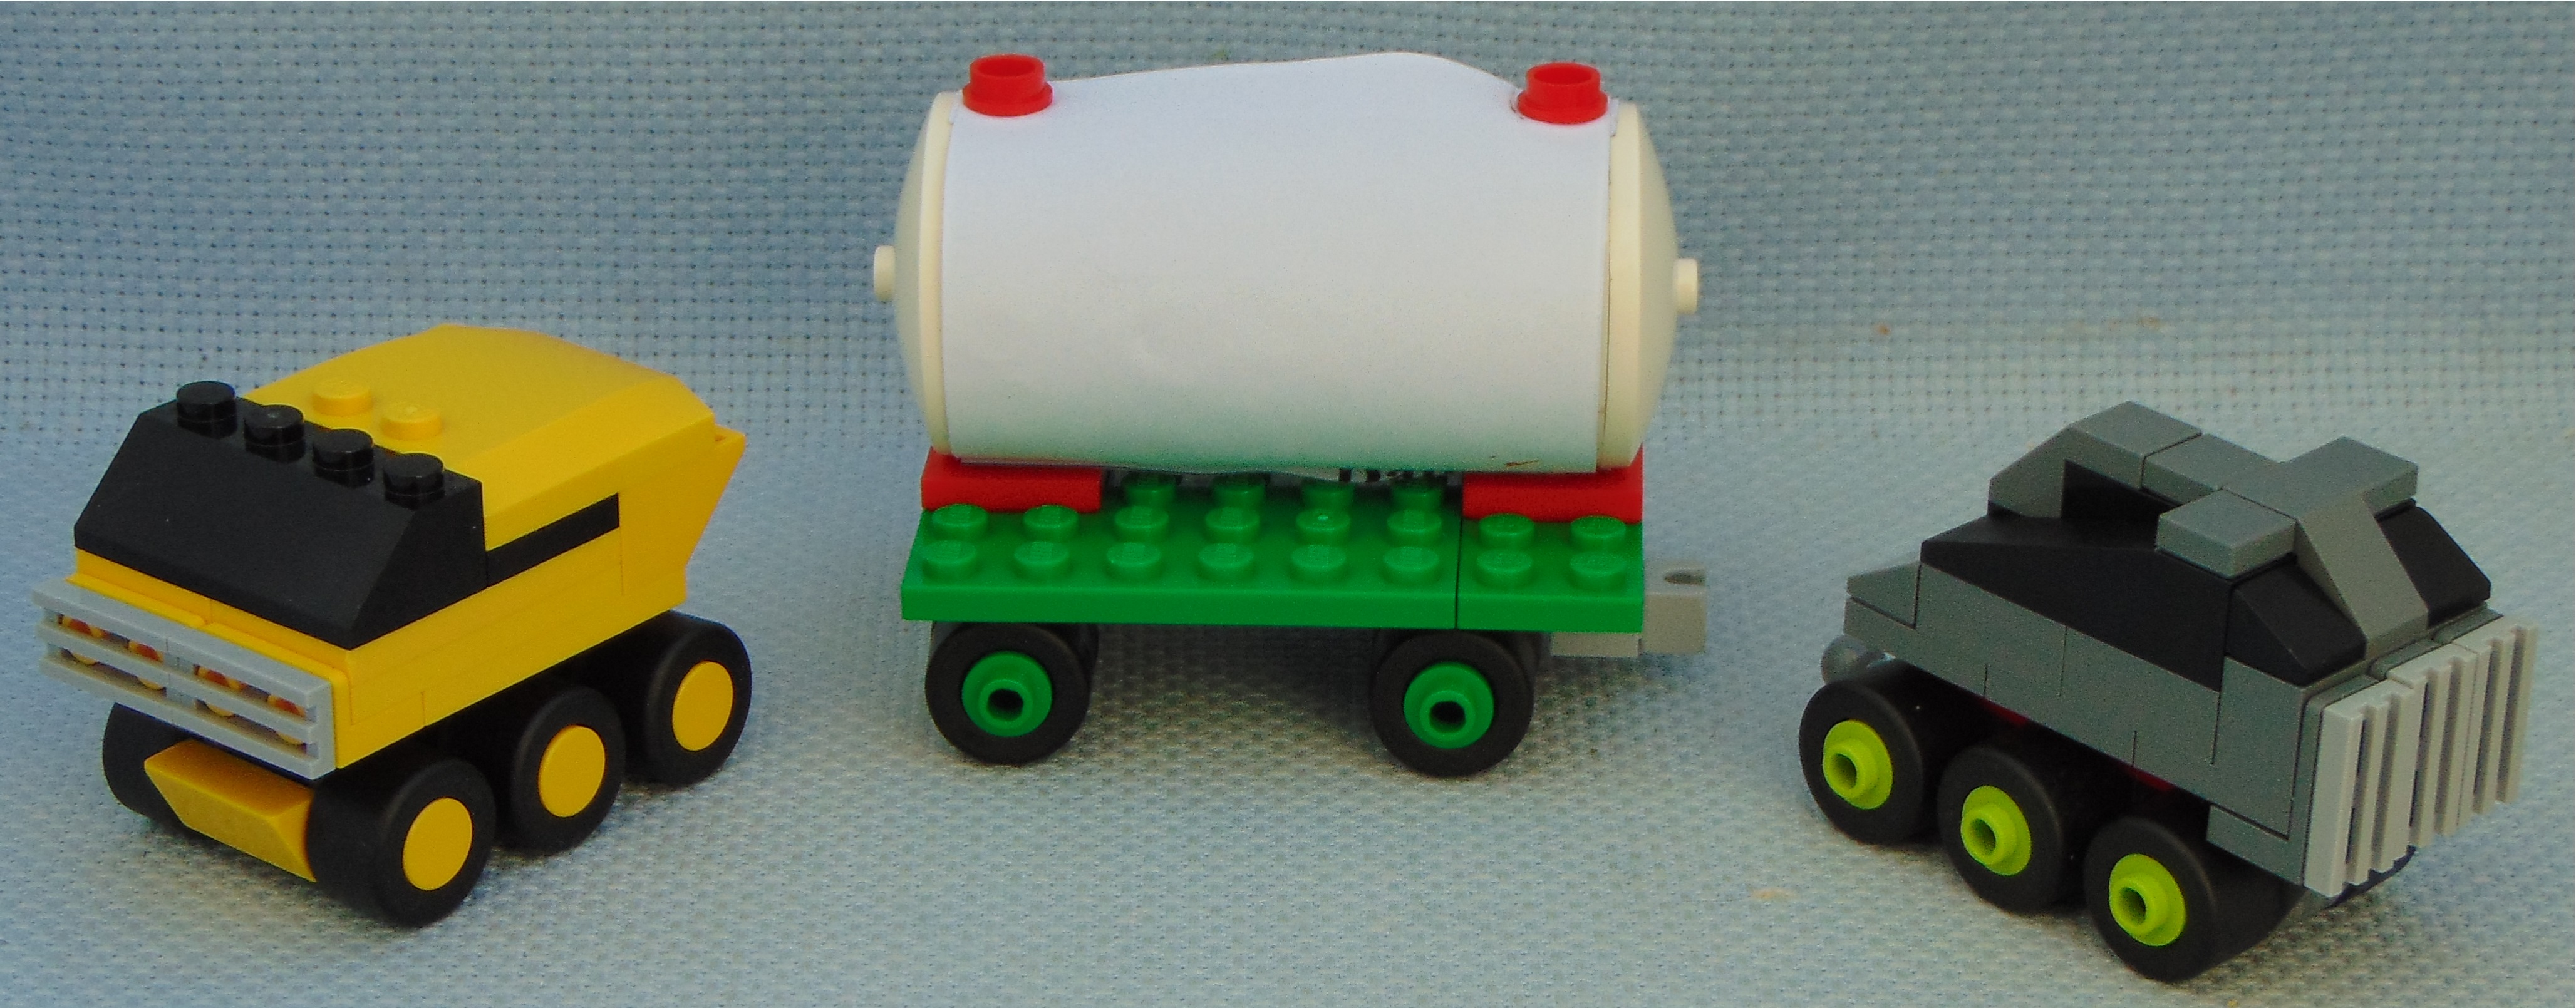
I actually made two different Tractors to haul the Trailer.  I made them different to highlight the nature of independent truckers and the differences between 3-wide and 4-wide design.  Also, because I already have a Tractor done up in Octan colors. 


The first one I built was made to look big and powerful.  It will take 2 or 3 Hits to no longer be Cover -- depending on where you are in relation to the attack.  It will take 8 Hits to completely destroy.


The second one is meant to look more "sporty" -- hence the color and the more streamlined design.  It will take 2 or 3 Hits to no longer be Cover -- depending on where you are in relation to the attack.  It will take 7 Hits to completely destroy.


Group Picture


Once again, I hope people like this continuing
exploration of using paper in terrain builds.

Monday, June 13, 2022

Terrain Workshop: Papercraft Silo

So I'm back on my Papercraft trip again.  I had an idea last week on how to make a silo using paper sections to make the sides.

The initial thought was using a 4x4 Round Brick w/Pinholes forming the base attachment points.  I then dug into my stash of Supports and came up with a 2x2x8 Support w/Grooves & Top Peg to provide the height.  It's topped out by a 4x4 Inverted Dish and a 1x1 Round Tile.  The paper sections are 3.75" L x 2.5" W and are standard copier paper.  In 6P Scale these are roughly 10' wide by 34' tall.  There are 12 pieces so it will take 2 Hits before being destroyed.

Small Silo


Parts


I then moved up to the 6x6 Round Plate for the next size using a 2x2x10 Triangular Girder for spacing.  Without the pin holes from the 4x4 Round Brick I had to add in some 1x2 Technic Bricks w/Hole for attachment points for the paper, still using 1x1 Round Plates to secure them.  It's topped out by a 6x6 Inverted Dish (Solid Studs).  The paper sections are 3" L x 3.75" W.  In 6P Scale these are roughly 15' wide by 34' tall.  There are 14 pieces so it will take 3 Hits before being destroyed -- you should be able to sneak in four more pieces take make it an even 18.  I'll admit these were the most difficult to assemble.

Medium Silo


Parts


Moving up again in size, the largest silo uses the 4x8 Half Circle Plate to define the diameter and the 2x2x13 Support w/5 Pinholes to provide the spacing.  I keep the 1x2 Technic Bricks w/Hole for attachment points for the paper, again using 1x1 Round Plates to secure them.  I added in four 4x4 Macaroni Bricks and four 1x2 Bricks to pad out the parts count a little.  It's topped out by a 8x8 Inverted Dish (Solid Studs).  The paper sections are 4" L x 4.5" W.  In 6P Scale these are roughly 20' wide by 46' tall.  There are 24 pieces so it will take 4 Hits before being destroyed.

Large Silo


Parts


One of the fun things about these builds is that, due to the pieces with Pinholes, you could possibly replace the 1x1 Round Plates with Friction Pins and run 7mm Ribbed Hose between the silos like they held some sort of liquid or as if they were giant stills.  Unfortunately the assembly of the larger silos was so annoying I didn't try.  I think the for the six stud across designs would be best to replace the 1x2 Technic Bricks with 2x6x1.3 Technic Brick w/Axle Holes.  That then brings into question the center support.  I guess that will be grist for a future blog post.

Once again, I hope people like this continuing exploration of using paper in terrain builds.

Friday, June 10, 2022

Review: 41958 Extra Dots 7

Let's do something simple for a Friday.  I purchased this at my local Lego store.  This is part of the seventh Series of the Dots line.


Bag.  I paid
 $3.99 for a $0.03 Price per Piece.


Parts.  Printed Tiles, Light Aqua Round Tiles, Bright Yellow Round Tiles, Transparent Blue Round Tiles, Light Bley Quarter Circle Tiles, Coral Quarter Circle Tiles, Teal Quarter Circle Tiles, and Dark Blue Quarter Circle Tiles
 
Build.  None, as these are all accent parts.

The Questions:
Can you build something -- a frame, station, or starship -- right away?  No. (-5)
Is it below, at, or above the golden ratio?  Below. (+5) (The Golden Ratio is $0.10 per part.)
If you can't build a frame right away, or choose not to, does it have parts you should be able to put into use right away?  Yes. (+5)
Does it have more than a handful of immediately useful parts?  Yes. (+5)
Score: +10 (A-).  So I think that Series 4 Extra Dots was the high point in terms of diversity of parts/colors for Extra Dots sets but I like the colors available in this one, especially as I need more Translucent Blue Round Tiles.

Wednesday, June 8, 2022

Review: Block Tech US24-2032 3-in-1 Shifter Review

These are available at 5Below and there are -- at least -- three different versions.  I thought this one had the most interesting pieces so I purchased it for a review.


Box.  I paid $5.00 for a $0.04 Price per Piece.

Instructions & Stickers.


This is how everything was packed away in the box.  


Parts 1.  Plates, Triple Curve Wedge, Large Jumper, Ball Joint Plates,
Axle Plates, Tires, Air Intake Brick, Translucent Panels, Slopes, Dishes,
 Curved Bricks w/Cutout, Inverted Slopes, Minifig Steering Wheel
Base, Rims, Bracket, Optimus Prime Head, and Wheel Arch Bricks.


Parts 2.  Ball Joint Plates, Pin Ball Joints, Corner Plates, Plates,
Jumpers, Grille Tiles, Tiles, Large Cheese Slopes, Studless
Slopes, Hinge Plates, Transparent Round Plates, Cheese Slopes,
Base, Lever, 1L Liftarm/Connector, and Minifig Steering Wheel.


Build.  Two Frames and a Station.
 
The Questions:
Can you build something -- a frame, station, or starship -- right away?  Yes.  (+5)
Is it below, at, or above the golden ratio?  Below.  (+5) (The Golden Ratio is $0.10 per part.)
If you can't build a frame right away, or choose not to, does it have parts you should be able to put into use right away?  Yes.  (+5)
Does it have more than a handful of immediately useful parts?  Yes.  (+5)
Score: +20 (A+).  Not bad but it really needs some sort of Clip or Bar Plate.

Monday, June 6, 2022

Doomsday Hazard

Joshua posted an article on Xenoglyph a couple of months ago about expanding the rules for Hazardous Terrain.  I had an idea the other morning about expanding that even further and using Hazardous Terrain as and/or tying it into the Doomsday Clock.

The basic idea I had was for every tick of the Doomsday Clock one square foot of the battlefield is covered by the Hazardous Terrain.  Looking at battlefield size, a general estimate is that they will be somewhere between 9.26 and 13.47 square feet.  So that means you could cover all or most of the battlefield with Hazardous Terrain by the end of the game by following the 1 Sq. Ft. per Tick method, depending on the size of the table and how much of the battlefield starts out as Hazardous Terrain.

As to what kind of Hazardous Terrain, fire comes to mind immediately.  A Trans-Orange Castle Dragon Flame, a Trans-Red Round Brick, and a Red 2x2 Round Plate combine to make a cheap and simple marker for "fire".  Also, if you want to keep the parts expenditure low, you only need to build enough to cover the leading edge of the fire and maybe a couple of spots behind it.  Or you could go with scrapbooking paper like this and just slide it under the terrain to represent an area like "The Shimmer" from the movie "Annihilation".  These are just two examples of ways to represent this type of Hazardous Terrain in both the physical and story sense.

Baseplates aren't one square foot, but using them to illustrate the advance of the Hazardous Terrain is easier than putting a grid on another battlefield.  The second one to come up in my search was Airfield Ambush 5 -- the first one was Asian Antenna Farm but the plates aren't even in that game -- so we'll use that grid and the clock count from that game as an example of how this might work out in play.

Start of the game.  We'll outline three baseplates to start.
DDC 11

DDC 8


End of Round 1.
End of Round 2.
DDC 3

DDC 0


End of Round 3.

As you can see, by the end of the game the fire would cover 14 out of 15 full size baseplates.

This rule modification is probably the closest MFZ: Rapid Attack will come to an "advanced" version as it covers a number of variables that have to be analyzed before and during gameplay.  One, do you equip all, some, or none of your Frames with Environmental Systems to deal with the Hazardous Terrain.  Two, the choice of the number of Frames and Systems.  Three, aiming for Initiative position.  Four, set up in relation to Initiative position and the Hazardous Terrain.  Five, gameplay in relation to events of the game and the Hazardous Terrain.

I'd really like to put this idea into play some day and see how it works.

Friday, June 3, 2022

Battle Report: Sci-Fi Outpost 7

After skipping a month due to schedule conflicts, we managed to get a game in over Memorial Day weekend.  I was unsure of what terrain I wanted to put on the table so I dug my old Sci-fi Outpost table-setting out of storage.  We started fairly late in the day so we went with a Skirmish to hopefully speed things up a bit.

Rook (4 Frames & 15 Systems) = (6 Points per Asset) * (6 assets) = 36 points.
   White Pelican Soldier -- 2Rd/1B/1G/1Y/2W.
   White Pug Fast Brawler -- 2Rh+d8/1B/1G+d8/2W + SSR.
   Blue Pug Soldier -- 2Rd/1B/1G/1Y/2W + SSR.
   Blue Camel Light RbF-- 2Ra/2Y/2W + SSR.

Chuck (4 Frames & 16 Systems) = (4 Points per Asset) * (6 assets) = 24 points.  (Old School Squad)
   Purple Recon by Fire -- 2Ra+d8/2Y/2W.
   Green Fast Brawler -- 2Rh+d8/1B/1G+d8/2W + SSR.
   Orange Fast Brawler -- 2Rh+d8/1B/1G+d8/2W + SSR.
   Yellow Defender -- 2B/1G+d8/1Y/2W + SSR.

Me (4 Frames & 16 Systems) = (4 Points per Asset) * (6 assets) = 24 points.  (Centurions)
   Green Soldier -- 2Rd/1B/1G/1Y/2W +SSR.
   Orange Soldier -- 2Rd/1B/1G/1Y/2W +SSR.
   Purple Soldier -- 2Rd/1B/1G/1Y/2W +SSR.
   Pink Brawler -- 2Rh+d8/2B/1Gd8/2W.

Occam's Spork (4 Frames & 16 Systems) = (4 Points per Asset) * (6 assets) = 24 points.
   Green Recon by Fire -- 2Ra+d8/2Y/2W + SSR.
   Red Recon by Fire -- 2Ra+d8/2Y/2W.
   Orange Bodyguard -- 2Rd/2Rh/2B/2W + SSR.
   White Bodyguard -- 2Rd/2Rh/2B/2W + SSR.

This is what the table looked like at the start of the game.


Events of Turn 1 (DDC @ 11): Rook's Blue Camel hits the Micro Greenhouse in front of Occam's Spork's Red frame for 1.  Rook's White Pug hits Occam's Spork's White frame for 2 and moves towards the Solar Panel Installation.  Occam's Spork's White frame then hits Rook's Blue Camel for 3, Station Dance.  My Green Centurion jumps down off the shuttlecraft, towards Rook's Power Unit Station, and hits Rook's Blue Camel for 1.  Occam's Spork's Orange frame moves towards my Green Station and hits Rook's White Pelican for 1, which moves from one Greenhouse to the next.  Rook's Blue Pug Captures my Green Station.  Chuck's Orange Old School moves towards the Greenhouse next to Rook's Power Unit station and hits Rook's White Pelican for 1 with a SSR.  Chuck's Purple Old School hits Rook's Blue Camel for 1.  Occam's Spork's Red frame blasts Rook's White Pug for 5.  My Orange Centurion moves out from behind a Spike Tree and moves towards the center of the battlefield, hitting Rook's Blue Camel for 4 -- destroying it -- at the same time dealing 1 Hit to the Spike Tree covering it.  Occam's Spork's Green frame hits Rook's White Pug for 1 with a SSR, destroying it.


Rook:
 30 points.

Chuck: 24 points.
Occam's Spork: 24 points.
Me: 20 points.


Events of Turn 2 (DDC @ 8): Chuck's Yellow Old School charges past my Green Centurion and captures Rook's Power Unit Station.  Rook's Blue Pug hits Occam's Spork's White frame for 1 while moving to the far side of the Greenhouse.  Chuck's Purple Old School hits Occam's Spork's White frame for 2.  Chuck's Orange Old School runs forward and clubs Occam's Spork's Orange frame for 4.  Occam's Spork's Orange frame takes a step to the right and captures my Green Station which was under Rook's control.  Occam's Spork's Green frame, in cover behind the Drill, hits Chuck's Orange Old School for 1.  Occam's Spork's Red frame hits Chuck's Green Old School for 3 then moves towards the Drill.  Rook's White Pelican hits Chuck's Green Old School for 4, destroying it, then moves beside the Number Two Quonset Hut.  My Green Centurion moves near Chuck's Yellow Old School and hits Occam's Spork's Orange frame for 1, Station Dance.  My Purple Centurion moves past the Bug Train and hits Occam's Spork's Orange frame for 1.  My Pink Centurion moves to the other side of the damaged Spike Tree and captures Rook's Scientist Station.


Occam's Spork:
 28 points.

Chuck: 24 points.
Me: 24 points.
Rook: 12 points.


Events of Turn 3 (DDC @ 4): My Pink Centurion keeps moving forwards and hammers Occam's Spork's Orange frame for 2, destroying it.  Chuck's Orange Old School clubs Occam's Spork's White frame for 1, Station Dance.  Chuck's Orange Old School then claims my Green Station which was under Occam's Spork's control.  Rook's White Pelican hits my Pink Centurion for 3 then moves to the far side of the Number Two Quonset Hut.  Rook's Blue Pug moves to the center of the battlefield to recapture his Scientist Station, then hits my Orange Centurion for 4.  In response, my Orange Centurion moves towards Chuck's Yellow Old School and hits it for 3.  My Purple Centurion moves to the other side of the damaged Spike Tree and hits Chuck's Yellow Old School as well, this time for 2.


Chuck:
 24 points.

Occam's Spork: 20 points.
Me: 20 points.
Rook: 18 points.


Events of Turn 4 (DDC @ 1): Chuck's Orange Old School hits my Pink Centurion for 1.  My Pink Centurion then takes cover behind Chuck's Orange Old School.  Rook's Blue Pug hits Chuck's Orange Old School for 2.  Occam's Spork's Red frame hits Chuck's Orange Old School for 2 and moves closer to the Silo.  Chuck's Purple Old School hits Occam's Spork's White frame for 3, destroying it.  My Green Centurion blasts Chuck's Yellow Old School for 5, destroying it, then leaps over the Number Six Quonset Hut to capture one of Chuck's Stations.  My Orange Centurion moves forward and captures Rook's Power Unit Station which was under Chuck's control.  The Doomsday Clock is ticked to zero.


Me:
 28 points.

Rook: 18 points.
Occam's Spork: 16 points.
Chuck: 16 points.


Here are several during and aftermath pictures.
Turn 1.3

Turn 1.4

Turn 2.3

Turn 4.5


Turn 4.6

Turn 4.7


Turn 4.8


Turn 4.9


Turn 4.10


Turn 4.11


Turn  4.12
Turn 4.13


Thoughts & Observations:
  • This was a Skirmish.
  • We haven't used this table-setting since 2016.
  • Although it has been on my mind since this blog post.
  • The lead changed hands several times and we each ended a turn in the lead.
  • This was a really fun game.
  • It was nice not being the "center of attention" for once.
  • This was the first time in 4.5 years that I've shared a table with Rook.
  • Flickr page.

Thursday, June 2, 2022

Review: 40460 Roses

I'm still interested in the larger Botanical sets and after reviewing the first smaller set I'm going to continue to do so.


Box.  MSRP is $12.99 for a $0.11 Price per Piece.

Instructions.


Parts 1.  Steering Wheels, Clip Claws, Triple Curved
Wedge, Windscreens w/Bar, and Round Bricks.


Parts 2.  Brackets, Clip Plates, Wing End Curved Slopes, 3L Axle Connectors,
Axles, Angled Axle & Pin Connectors, Tooth Plates, Apollo Studs, Round Flower
Plates, Cattle Horns, Pin Connectors w/Clips, Round Plates, and Large Jumpers.


Build.  Frame and four 1 Hit pieces of Cover.

The Questions:
Can you build something -- a frame, station, or starship -- right away?  Yes.  (+5)
Is it below, at, or above the golden ratio?  Above.  (-10) (The Golden Ratio is $0.10 per part.)
If you can't build a frame right away, or choose not to, does it have parts you should be able to put into use right away?  Yes.  (+5)
Does it have more than a handful of immediately useful parts?  Yes.  (+5)
Score: +5 (B+).  Tons of useful parts but the pricing brings the score down.